 Skip to content
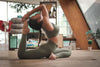
Cow Face Pose: The Basics

Yes, this pose actually does resemble a cow's face if you look closely. When performing this pose, your body seems to create the face of a cow where the legs are crossed to recreate the nose and mouth of the cow and the arms are positioned to imagine a set of ears atop the head.
But there are other reasons to perform Cow Face Pose besides trying to look like one. This is a pose designed for stretching the hips and shoulders while calming the mind. The end result is a body in complete balance with an emphasis on proper posture. The primary goal of Cow Face Pose is to correct the imbalances that often exist between the right and left side of the body by stretching the upper and lower regions of both sides at the same time. You won't believe how much this can rejuvenate and replenish the mind, the body, and soul by restoring balance and serenity.
Related: How To Do Eagle Pose (Garudasana)
How to Do Cow Face Pose
So let's get right to it. Follow these easy instructions to help you perform the pose correctly:
- Begin seated in Staff Pose. Bend the knees and place both feet on your mat.
- Bring the left foot beneath the right knee so that it reaches the outer edge of the right hip.
- Bring the right leg above the left, setting the right knee on top of the left knee and placing the right foot at the outside of your left hip.
- Hold both heels central to your hips, and if need be pull the right heel close to your left hip.
- Remain seated in an even position on the sitting bones.
- Stretch the right arm out to your right side so that it remains parallel with the floor.
- Rotate the arm inward so the thumb is first pointed to the floor and then behind you. The palm of the hand should be pointed at the ceiling.
- Now, bring that arm behind you and hold your forearm at the middle of the lower back, keeping it parallel to the waist and the right elbow at the right edge of the torso.
- With a rolling motion of the shoulder, bring the forearm up the back until you feel it positioned parallel to the spine. You'll feel the back of the hand nestled in between the shoulder blades.
- Be careful not to let the right elbow move out of place from the right edge of your torso.
- Next, stretch the left arm straight out so that it's pointed away from you at an opposite wall and parallel to the floor.
- Palm up, stretch the arm up to the ceiling. Twist the palm back.
- Lift and bend the elbow as you reach to the floor with your right hand. Try to link the fingers on the right and left hands. If you're unable to do so, be sure not to force it.
- Bring the left elbow up to the ceiling and drop the right elbow down to the floor.
- Press the shoulder blades up to your back ribs as you lift your chest up. Be careful to hold the left arm in place against the left side of your head.
- Hold the pose for up to sixty seconds.
- When you're ready to come out of the pose, release the arms first, then bring your legs apart and switch sides. Hold for another minute.

Warming Up
You may want to try doing a pose or two to get yourself warmed up for performing Cow Face Pose.
One of the best poses to try first is Bound Angle Pose.
- Beginning in Mountain Pose, stand facing one side of the mat. Bring both arms out at the sides.
- Move both feet out so they are positioned in line with each of your hands.
- Rotate your left foot slightly and twist the right out at a ninety degree angle.
- Bend the front knee at a right angle, holding it directly above the ankle.
Variations on Cow Face Pose
You should never feel too intimidated by any yoga pose because you have options for making it easier. Poses can always be modified with the use of props, or you may modify the pose itself. Here are some of the best variations for making Cow Face Pose more accessible to any skill level. Most of these options can lend support and comfort to various parts of the body.
- Tight hips are one of the leading causes of yoga pose avoidance. In the case of Cow Face Pose, you can rely on blankets, a block, or bolster for helping you execute the pose without having to sit directly on the floor. Lifting the hips higher than the knees will drastically minimize any discomfort or undue stress on tight hips, even the knees, and your back.
- Sometimes a blanket or pillow between the upper parts of the thighs can lend much needed support for anyone with a wide distance between the knees.
- For those of you who are unable to clasp their fingers when performing Cow Face Pose, grab a strap and use that to keep the hands together. As you practice further and your flexibility improves, you can hold the strap with your hands closer until the fingers can finally hook together on their own.

Final Thoughts
Tight hips and shoulders can discourage anyone from doing yoga. But repetition is key to loosening up these regions of the body through consistent dedication to your practice. The more you work, the more flexible and limber you will become. Making the decision to incorporate Cow Face Pose into your routine can go a long way towards helping you reach your goals, be it physical or mental.
Just remember to stretch your body evenly and distribute the energy throughout both sides equally. That means raising the arm on the same side of the body as the bottom leg. In addition, you must always remain cognizant of your breathing. This is about relaxing. When your breathing is smooth and measured you relax more and that will allow your tightness to subside.
Want to learn more about different Asanas? Check out our blog all about Yoga Poses!


Leave a comment