 Skip to content
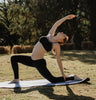
How To Do Mountain Pose For A Better Practice

Mountain Pose is an elementary standing pose that is typically used to train oneself for other more complex and challenging yoga poses. On its own, Mountain Pose or Tadasana may seem entirely basic but, in reality, there is a lot going on when you're performing this simple pose. It's a beginner-level pose that places an emphasis on body posture and alignment.
Standing in place may not feel like you're accomplishing much, but when you critically dissect how your body is working while you're in the pose, you begin to better understand the work it takes to execute it correctly.
Let's examine how to do Moutain Pose, the main benefits it offers, and everything else you need to know about doing Mountain Pose properly.
Related: Everything You Need To Know About Downward Dog
Why Is Mountain Pose Important?
Mountain Pose is all about improving your posture and placing the body into alignment. That requires more work than you might expect as it demands that you become fully aware of what every part of the body is doing. That includes the leg muscles, the back, and neck as your spine is elongated and your skeletal structure is properly aligned. You may be surprised at how much of a workout you get from Mountain Pose as you engage all of these portions of the body.
As your practice grows, you'll find the alignment that comes from Mountain Pose is also an essential component for many other standing poses. These include Tree Pose, Chair Pose, and Warrior I as well as handstands and headstands (Read about the benefits of handstands). If you want to nail your handstand, you’ll first have to master Mountain Pose.

How To Do Mountain Pose
This is the foundation upon which so many other yoga postures are based and it's vital that you are able to perform Mountain Pose correctly. The following steps will get you into the proper position:
- Start by standing in place.
- Bring your toes up and spread them out, lowering them back to your mat so they remain apart. This will enable you to create a wider base upon which to stand. (You may feel your ankles thumping into one another, so feel free to separate the heels if that contact becomes too uncomfortable for you.)
- Stand in place, allowing your feet and your calves to root into the mat.
- Focus on the quads, bringing them up towards you as your kneecaps lift.
- Turn your thighs in, to broaden your sitting bones.
- Focus on continuing the natural curvature of the spine.
- Pull in the belly slightly.
- Broaden your collarbones while keeping the shoulders placed directly over the pelvis.
- Pull your shoulders up towards your ears in a shrug, then roll them backward as your shoulder blades are lowered down the back.
- Allow the arms to hang naturally, keeping the elbows bent slightly and the palms pointed forward.
- Next, keep the neck elongated and the head set straight. The chin should not be allowed to push down or lift up. Keep the crown of the head rising toward the sky.
- Audit all of your alignment positions, then hold the pose for 5 to 10 breaths.
The Positioning Of The Feet
There is some debate as to the best way for placing your feet in Mountain Pose. Many teachers will tell you to place the feet together so that the big toes are kept in contact with each other. But there is an argument to be made for standing with the feet separate and holding them in line with your hips. This position keeps your body in a straight line, maintaining your center of gravity better than if your feet were kept closer together.
Holding your body in a straight vertical means your body weight is more evenly distributed and offers a more energy-efficient way to carry that weight. You're not expending more energy than is necessary, which allows for the pose to be more effective for improving body posture and alignment.
This placement is also a lot safer for your knees and your feet in terms of putting pressure on them during the pose. The less of an angle you incorporate in your body, the less stress you're putting on your joints and the feet.
In the end, the decision is up to you. Always choose the stature that is most comfortable for you.

Making Adjustments To The Pose
While Mountain Pose is a fundamental part of so many other standing poses and inversions, there are a limited number of adjustments and variations you can try using the placement of the hands. Moving your hands into different positions will add a little variety and a few extra benefits to the posture.
Anjali mudra is a good start, where the hands are brought together in front of your chest. The palms meet as if you are praying. You can arrange the hands into this position and close your eyes for some useful meditation and self-reflection.
Another option has the placement of the hands at the outside of the thighs with the arms resting at the sides. Yet a third choice gives you the option to bring the arms out or over your head with the fingers intertwined, pointer fingers pointed toward the sky.
The Benefits Of Mountain Pose
As you may have guessed, there's more to Tadasana than just better posture and improved alignment. Practicing Mountain Pose can also bring the following advantages:
- Strengthen the legs
- Strengthen the triceps and biceps
- Improve your balance
- Strengthen the back muscles, glutes, and hamstrings
- Tone your abs
- Contour the hips
- Provide relief from symptoms associated with sciatica
When You Shouldn't Do Mountain Pose
Every yoga pose comes with warnings and this one is no different. Here are some of the things to keep in mind before you take a shot with Mountain Pose:
- As this is a standing pose, you want to be careful not to fall down. Therefore, anyone experiencing symptoms of vertigo or low blood pressure should take care. Maintain your balance by keeping your feet spread further apart for a wider center of gravity.
- Anyone who has a history of hyperextending the knees should take every precaution and focus on working the hamstrings a little harder so as to prevent that hyperextension.
- Pregnant women should take care in doing this pose by separating their feet as wide as the hips or wider even so as to have a stronger base upon which to practice the pose.
Final Thoughts
Think of Mountain Pose as your entry into standing poses. Start by working to perfect this pose and then you can work your way up towards more challenging and complex standing postures that rely on proper alignment and good balance. Mountain Pose can work towards increasing your skills and leave you feeling stronger in the bargain.
Want to master more yoga postures? Be sure to check out the Yoga Society Poses Blog.


Leave a comment