 Skip to content
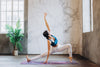
How To Master Bow Pose

When it comes to yoga poses for individuals who spend most of their day in a seated position, there is no shortage of poses to try. If you’re a desk jockey who has to sit at a computer for eight hours a day you might find yourself slumped over with a marked curvature in the back. Even if you’re not at a desk all day, you might spend your time routinely chasing after and picking up small children or work a job that has you lifting and lowering heavy objects on a regular basis.
Whatever it may be, you need something to balance out the pressure from staying in a hunched-over position for such a long time, each and every day.
That's where the Bow Pose comes in. This posture is ideal for the slightly more advanced yoga student who needs to do some work on opening the chest and shoulders while strengthening the back at the same time. But these are just a few of the benefits of Bow Pose.
Related: How To Do Cobra Pose The Right Way
Benefits Of Bow Pose
There are a number of advantages you can expect to enjoy when you perform this posture. First and foremost, Bow Pose stretches the front of the body with a particular emphasis on the chest and shoulders. The abdomen, thighs, and groin muscles will also become stretched.
While the front of the body is getting opened up, the back muscles increase in strength. This can be beneficial to your overall posture and even work toward reducing the symptoms associated with back pain. You might even find that your internal organs around the abdominal area feel stimulated. If you suffer from asthma, Bow Pose can be very therapeutic.

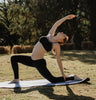
How To Do Bow Pose
- Start the pose on your stomach. Allow your hands to lie flat at either side and your chin to be at rest on the mat.
- Exhale as you bend your knees.
- Lift your heels toward your buttocks with the knees kept apart from one another, in line with the hips.
- Bring your hands up and reach towards your legs, then grab the ankles and hold them in place.
- Inhale as you bring your heels up to the sky while allowing your thighs to lift up from the mat. As you do this, you'll feel your torso and chest lift up as well.
- Bring the tailbone down to the mat while drawing your thighs and heels higher.
- Bring your chest up as the shoulder blades push together at the upper part of the back. Draw the shoulders from your ears as you stare ahead.
- Maintain your breathing. This is important: it may start to feel like your breath is becoming weak, but do not hold it in.
- Stay in the posture of a period of thirty seconds at most.
- As you release the pose, exhale and slowly bring your thighs back to your mat. Let go of your ankles, allowing your legs and feet to return to the mat.
- Bring the side of your head to the mat and bring the arms at rest by your sides for 3-5 breaths.
- Repeat the posture again, this time coming to rest with your head at the opposite side on your mat.

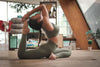
Adjustments to Bow Pose
Not everyone is going to be flexible enough to do the Bow Pose unassisted. No matter your skill level, there are some adjustments and modifications you can make to help you achieve the pose. This way you can avoid overexerting yourself or forcing your body into an unnatural position that could lead to injury.
Feel free to incorporate normal props into your practice so that Bow Pose is easier for you.
Straps are a good way to allow you to reach your ankles should you be unable to hold them with your hands directly. Wrap a strap at each ankle and hold the end of it instead, to reduce the distance you need to reach while keeping both arms extended out.
Some students might have an issue getting their thighs raised off the floor all the way without some additional support. That can also be addressed by placing a rolled-up towel or even a blanket under your thighs in order to lift the legs higher.
You can even increase the difficulty of the pose if you wish, by adding some adjustments to the position of the body. The Bow Pose is tougher to perform when you narrow the distance between the thighs, calves, and insides of the feet.
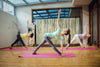
Preparing For Bow Pose
As we've mentioned already, Bow Pose is not ideal for beginners. It is highly suggested that you approach Bow Pose slowly because your flexibility may not be sufficient enough to perform the pose properly. If you're still feeling tight and tense, without the malleability for reaching the correct form in order to do the pose, you may want to work your way up by trying out some beginner-friendly postures to help you grow more flexible.
Cobra Pose
This energizing pose is a great introductory posture that allows you to perform backbends in a manner that is similar to the degree with which you would expect to hold in Bow Pose. Think of Cobra as the beginner version of Bow, engaging your abdominals and increasing your flexibility evenly along the spine.

Locust Pose
Another pose that has you placing your body in a similar position, Locust Pose works to stretch the chest and shoulders while increasing the muscular strength in your back. This one also stimulates the abdominals and helps to correct your overall body posture. Start here to help build up your backbends.

Bridge Pose
The Bridge Pose offers many of the same benefits as the Bow Pose and the other preparatory postures listed above. This pose works towards helping to increase the strength in the legs and the back.

What To Avoid In Performing Bow Pose
One of the suggested adjustments we discussed was the use of straps for anyone who was having trouble reaching their ankles in the pose. But if you are able to reach and grab your ankles without the use of props, be sure not to grab your feet instead. This can throw off your balance should you lose your grip, resulting in possible injury from your feet or chin crashing back to the mat.
Another thing to consider is how you release the pose. Similar to how your body parts can fall hard to the ground should you lose your grip on your feet, releasing the pose can pose injury from allowing your feet or chest to come back down too fast and hard. There is a particular order to follow as you release, waiting for your feet, thighs, chest, and head to all come back to the mat before fully releasing yourself from the pose. Do everything slow and steady ahead of letting go of your ankles.
Final Thoughts
Bow Pose takes a lot of work to perform properly. Don't attempt to try it without first easing yourself into the posture by trying out the preparatory poses suggested. One last reminder: do not hold your breath as you execute the pose. When you restrict your breath from flowing freely you may be preventing the chest from reaching a full and complete stretch. This defeats the purpose of what you're trying to accomplish with this chest-opening pose.
Be sure to visit the Yoga Society Blog to learn more about how to improve your yoga practice.


Leave a comment